Build a Bot
Guide to create a brand new bot from scratch
Currently this is a manual process: either starting from scratch and following steps carefully, or copying/pasting a blank project and customizing it. In this part of the document we describe the "from scratch" approach.
In future we will provide a Visual Studio template, and a scaffolding tool to help make getting started easier.
Components to create
A bot usually consists of these elements (custom elements that you will have to create):
- LUIS app containing intents your bot can handle.
- Root dialog (sub class of AturaCoordinatorDialogBase) and associated RootDialogFactory.
- DialogLauncher with predicates, used by Root (coordinator) dialog.
- Dialogs that handle intents.
- .Resx files that contains bot phrases.
- Unit tests to test bot flows.
- Custom CSS to style webchat widget.
Optional elements, depending on features required:
- AgentAssistance dialog (sub class of AturaLiveAgentDialog) to kick off live agent assistance.
- Custom Interpreter and Actualizer.
- Processor Chains to help simplify complex dialogs.
- Custom Javascript (HtmlProviders) for webviews.
Workflow
Developers typically create a bot as follows:
- Create web project in Visual Studio.
- Reference Atura Nuget packages (Atura.Core.Bot and Atura.Core.TestFramework)
- Copy/paste the bootstrap JS and package.json files into the project.
- Create a new RootDialog, and expose it via the dialogFactory.
- Create first intents (possibly train LUIS to recognize phrases), or use a SilentInterpreter to avoid NLP and just process user text directly.
- Create new SubDialogLauncher.
- Create sub dialog, and hook it up to SubDialogLauncher by adding a predicate that matches the intent created above.
- Write a unit test to test the new logic.
- Continue building out dialogs, intents, unit tests, etc.
The sections below elaborate on the steps mentioned above.
Create ASP.NET MVC .NET Framework project
Create a new ASP.NET MVC (on the .NET Framework) project, using .NET runtime v4.6.2 or higher.
Reference the Atura nuget packages as described in section 2.5
Note that we do not support .NET Core yet, but will in future.
Running the webchat widget locally:
Copy the necessary front-end bootstrap files into your bot project. Atura will provide these scripts. This initial set of files contain a package.json file that includes our npm package references, as well as an .npmrc file that provides access to our npm package repo (not on npm.org).
Once node and npm have been installed, you can run the following command in command prompt to build the webpack bundle. (*note you have to run this command from the bot folder that contains the package.json file)
npm run build:watch
If the command succeeds you should see an output similar to below
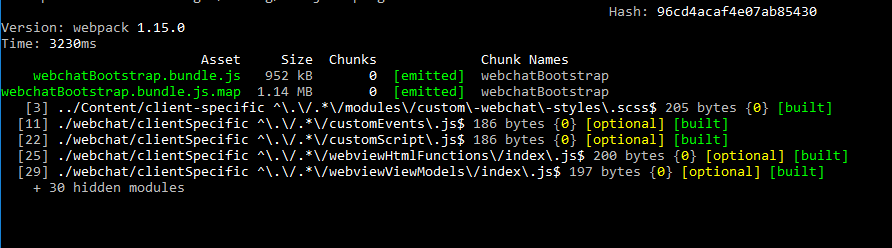
This will generate a web-chat version of your bot you can view in a browser with the settings from client.config and the custom scripts inside your solution folder "scripts".
As you edit any of the files listed above in order to tweak the bot front end behaviour, they will get saved and updated dynamically, so there is no need to re-run the build command.
SDK Access
Once you have your new Visual Studio bot project created, you can install the Atura.Core.Bot nuget package into your project, via an authorized feed to the Atura VSTS. To set this up, you need to add the source into your Nuget package manager in VS.
** Tools -\> Options -\> NuGet Package Manager -\> Package Sources**
Name: AturaNuGet
Source: https://atura001.pkgs.visualstudio.com/_packaging/AturaNuget/nuget/v3/index.json
Once you have added the Atura source, you should now be able to install the Atura.Core.Bot package from the NuGet package manager under the "Browse" tab. Choose the latest version under v2.0.0.*

Important : Atura will provide these files and account details needed to access our package repositories and source code repositories. Repository connections are specified in the .npmrc and NuGet.config files.
MessagesController
Create a new MessagesController and make sure it inherits from AturaMessagesControllerBase. The controller does not need any more than the following (note the necessary implementation of 'SetRootDialogFactory'. You need to provide a class that implements IRootDialogFactory, that returns the bot's Root dialog (see next section).
using Atura.BotShared.Controllers;

using Atura.BotShared.Dialog;

namespace CustomBot.Controllers

{
  public class MessagesController: AturaMessagesControllerBase
  {
    public MessagesController() : base()
    {
    }
      protected override IRootDialogFactory SetRootDialogFactory()
    {
    return new RootDialogFactory();
    }
  }
}
All messages via your bot will travel through the Messages controller's POST action, then get routed to the various sub dialogs you will create from that point.
public virtual Task\<HttpResponseMessage\> Post([FromBody] Activity activity)
You can get more information about the Bot Framework activity here
The most common practice after sending and receiving the message activity back is to handle the result in a "Root" dialog.
RootDialog
If you are building a large bot application, the need might arise for multiple root dialogs depending on which section of sub-dialogs you want to route the result to, but for now we will handle all results in a single root dialog.
Handling results:
Your root dialog will have to implement certain methods inherited from the base Atura package. The one that will handle the result from the Messenger controller (described above) will be
ProcessLanguageResultAsync (AturaDialogContext context, IDialogContext dc, IMessageActivity message, LanguageResult interpreted)
LanguageResults
Each dialog has an instance of an Interpreter, and an interpreter has an Actualizer that it uses to convert generic NLP results into more usable bot-specific results:
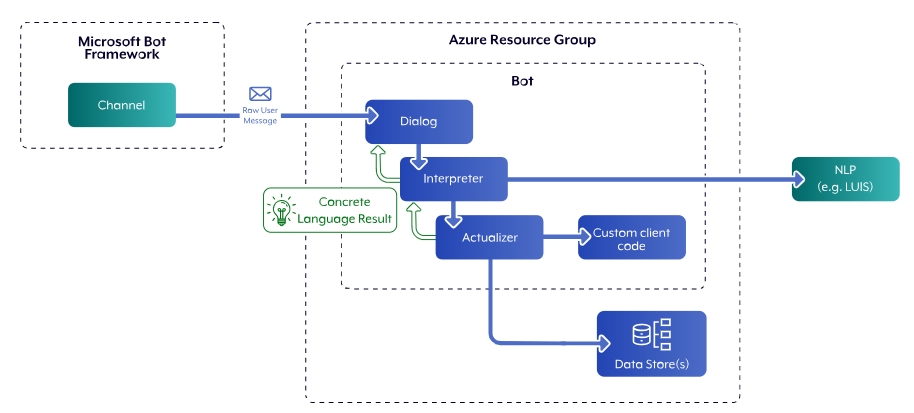
The Interpreter is responsible for calling an external NLP engine to get back an intent - that is it takes a raw string and returns what the user's "intent" with the text was. The intent is wrapped in a LanguageResult (or more specifically, in a "RawLanguageResultWithEntities"). Usually the Atura Luis Interpreter can be used as-is, while custom client-specific Actualizers should be created for use in your bot. See diagram below:
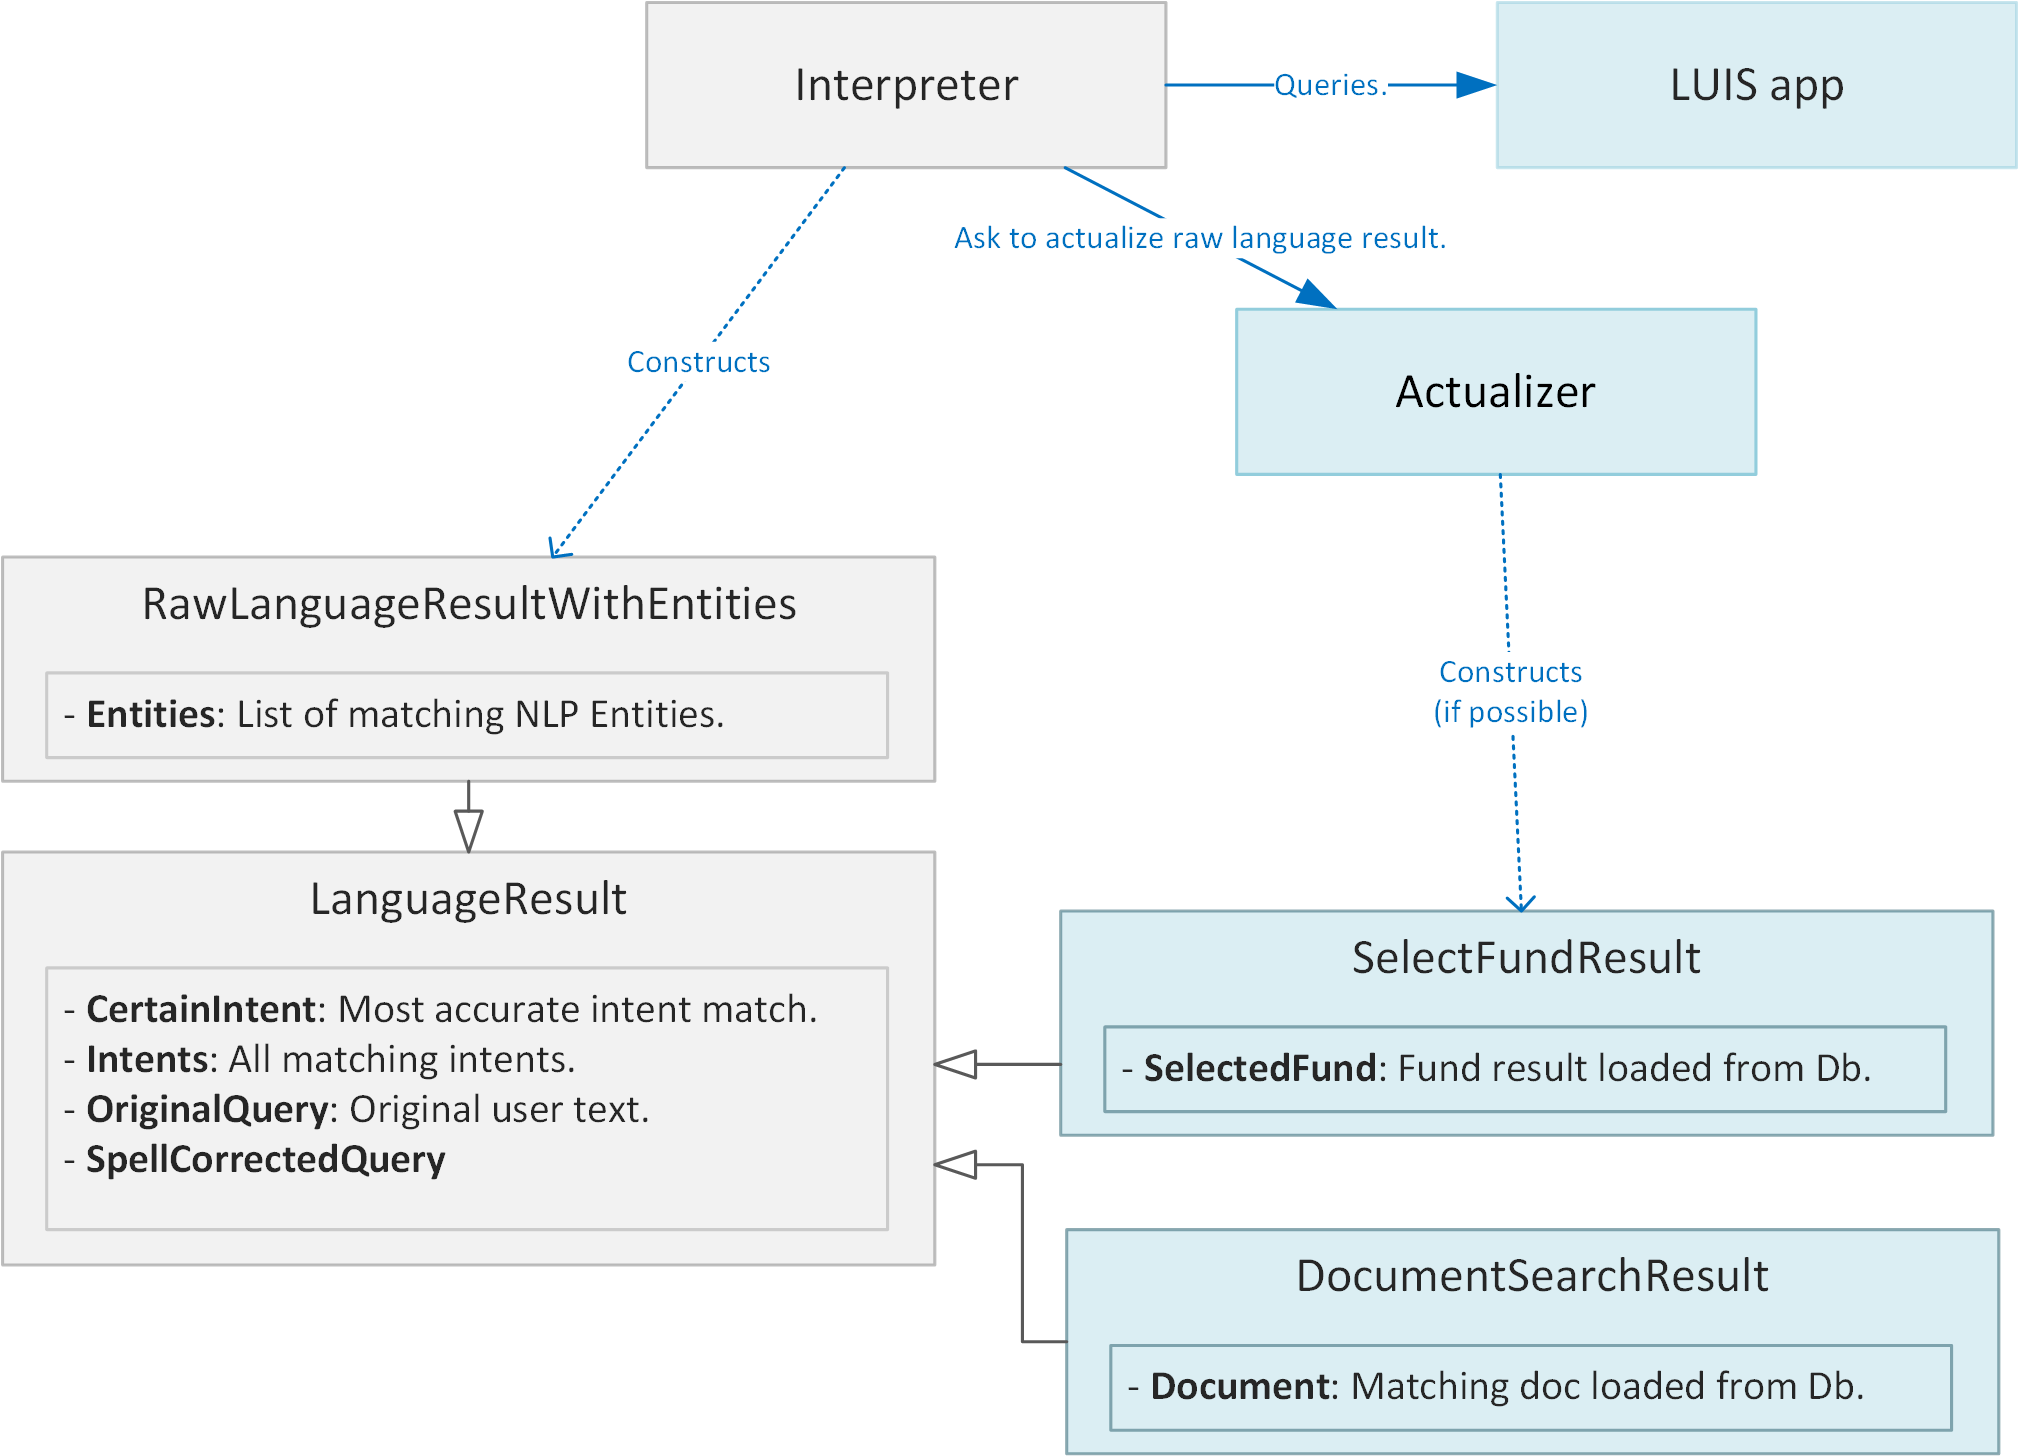
From there, the Interpreter passes the raw NLP-intent to the Actualizer. The Actualizer is responsible for turning the raw NLP result into a concrete Language Result that your Dialogs know how to process. The concrete Language Result instance may be very specific and even contain additional information i.e. information about bot-specific entities fetched from a data store. The blue blocks in the diagram above are bot-specific language results constructed by an Actualizer.
The language result is returned from an Interpreter implementation. The reason behind this is to gain insight into the user's utterance. It is broken down into two sections, intents and entities.
EXAMPLE:
I {want to book} {plane tickets} to {Cape Town}
I {INTENT: Booking} {ENTITY: Ticket Type} to {ENTITY: City}
It is not necessary to use an online NLP (Natural Language Processing) service like LUIS, but is encouraged as the AI behind the scenes is constantly getting updates and improving to determine the most accurate matches to your training.
Important: Interpreter.InterpretAndSaveMessageAsync() must be called whenever a user message starts or resumes a Dialog, because this ensures that message is persisted to the database, and that it is published to our service bus for viewing and potential agent takeover in the Service Desk.
This is done automatically when you resume from the ProcessAturaMessageResult method or a PromptDialog, but has to be done manually if you choose to capture user input and resume in custom method.
Atura offers a " SilentInterpreter" which will return the result as-is as an unknown utterance in a RawLanguageResultWithEntities, and you can handle the result accordingly from text matching instead of matched intents and entities instead of calling an NLP engine.
Sub-dialogs (Non-Root)
Here you will place your logic to handle the LanguageResult returned – for example if your Language result comes back with a "GREETING" intent captured from the user's utterance, you might want to forward to a sub-dialog which handles small talk between the user and bot. e.g. "Hi Joe, nice to meet you.", and handle other small talk.
The logic flow regardless of the Intent and Sub Dialog purpose remains the same.
User utterance =\> Process Message in Root =\> Launch appropriate sub dialog =\> Process message and pass dialog result back (or keep open and loop for multiple utterances) =\> Post Output to User =\> Wait for next message to Process.
Here is an example for a sub dialog being launched for a GREETING intent that launches the "Main Menu sub dialog".
else if (MatchesActiveIntent(intentTitle, Intents.Common.UserGreeting))
{
  await context.PostToUserAsync(dc, BotStrings.Root\_Greeting);
  context.LaunchSubDialog(dc, **MainMenuDialog** , ResumeRootDialog);
  return;
}
It is important to always resume and handle your result in the dialog for the next user's utterance (as you would with any bot based on the Bot Framework). By default, you might want that to always listen for messages in your Root dialog and launch sub dialogs accordingly, or you can keep a sub dialog open and process the utterances repeatedly in there creating a mini flow for your bot. (Such as capturing contact details like Name + Surname + Email etc.)
Creating a sub dialog:
When creating a new sub-dialog, you will need to inherit from the AturaDialogBase class for your processing of messages, and to open and close your custom dialogs. This will also expose functionality needed for handling common intents such as BACK, CANCEL and GREETINGS, as well as access to important libraries such as the AturaContext and DialogContext.
public class MyMainMenuDialog : AturaDialogBase
This topic of dialogs and sub-dialogs is further explained here:
Dialog Launcher
Each AI assistant needs its own specialized subclass of AturaDialogLauncherBase. This class acts as a "router"; it inspects an already interpreted LanguageResult and user message text, and determines which sub dialog (if any) to launch.
Here is a sample of a dialog launcher class that knows how to launch a ContactUsDialog or a MoreFundInfoDialog (but only for a specific type of user!). This approach is very unit-testable, extensible and flexible:
publicclassMyDialogLauncher:AturaDialogLauncherBase

{
  publicoverrideList<GetLaunchInstructions>SubDialogLaunchPredicates{get;set;}
  =newList<GetLaunchInstructions\>();

  {
    //AskAboutFund...
    (aturaContext,botFrameworkContext,languageResult,msgActivity)=\>;
    {
    if(UserIsAnInvestor(botFrameworkContext.UserData)
    &&languageResultisAskAboutFundaskAboutFund)
   {
    returnnewSubDialogLaunchInstructions(
    shouldLaunchSubDialog:true,
    openOrForwardToSubDialog:LaunchOrForwardTo.Forward,
    createSubDialogFunc:(langR)=\>newMoreFundInfoDialog(langR));
    }

    returnnull;

  },

  //RequestContactDetails...
  (aturaContext,botFrameworkContext,languageResult,msgActivity)=\>;
    {
    if(languageResultisAskForContactDetailsaskContactDetails)
    {

    returnnewSubDialogLaunchInstructions(
    shouldLaunchSubDialog:true,
    openOrForwardToSubDialog:LaunchOrForwardTo.Open,
    createSubDialogFunc:(langR)=\>newContactUsDialog(langR));
    }

    returnnull;

    }

  };

}
This design will help you to keep the root dialog light, managing the launch instructions and order in which sub dialogs should be prioritized (top to bottom). Typically all important sub dialogs will have an entry in the SubDialogLauncher.
Receiving user messages in a sub dialog:
A dialog's PostStartDialogMessage is always called, but may be empty and do nothing. The ProcessAturaMessageAsync method is called:
- When the dialog was launched by its parent via
CurrentContext.LaunchSubDialog: then ProcessAturaMessageAsync will only be called when user sends the first message after the dialog has been launched. - When the dialog was launched by its parent via
Currentcontext.ForwardToSubDialog: then ProcessAturaMessageAsync will be called immediately after PostStartDialogMessage with the forwarded message.

Structuring a complex sub dialog that can do many things
It is easy for a dialog's code to get big and unmanageable if the dialog does more than a handful of things. For more complex dialogs, use the ProcessorInChain pattern as shown in the following diagram and code sample:
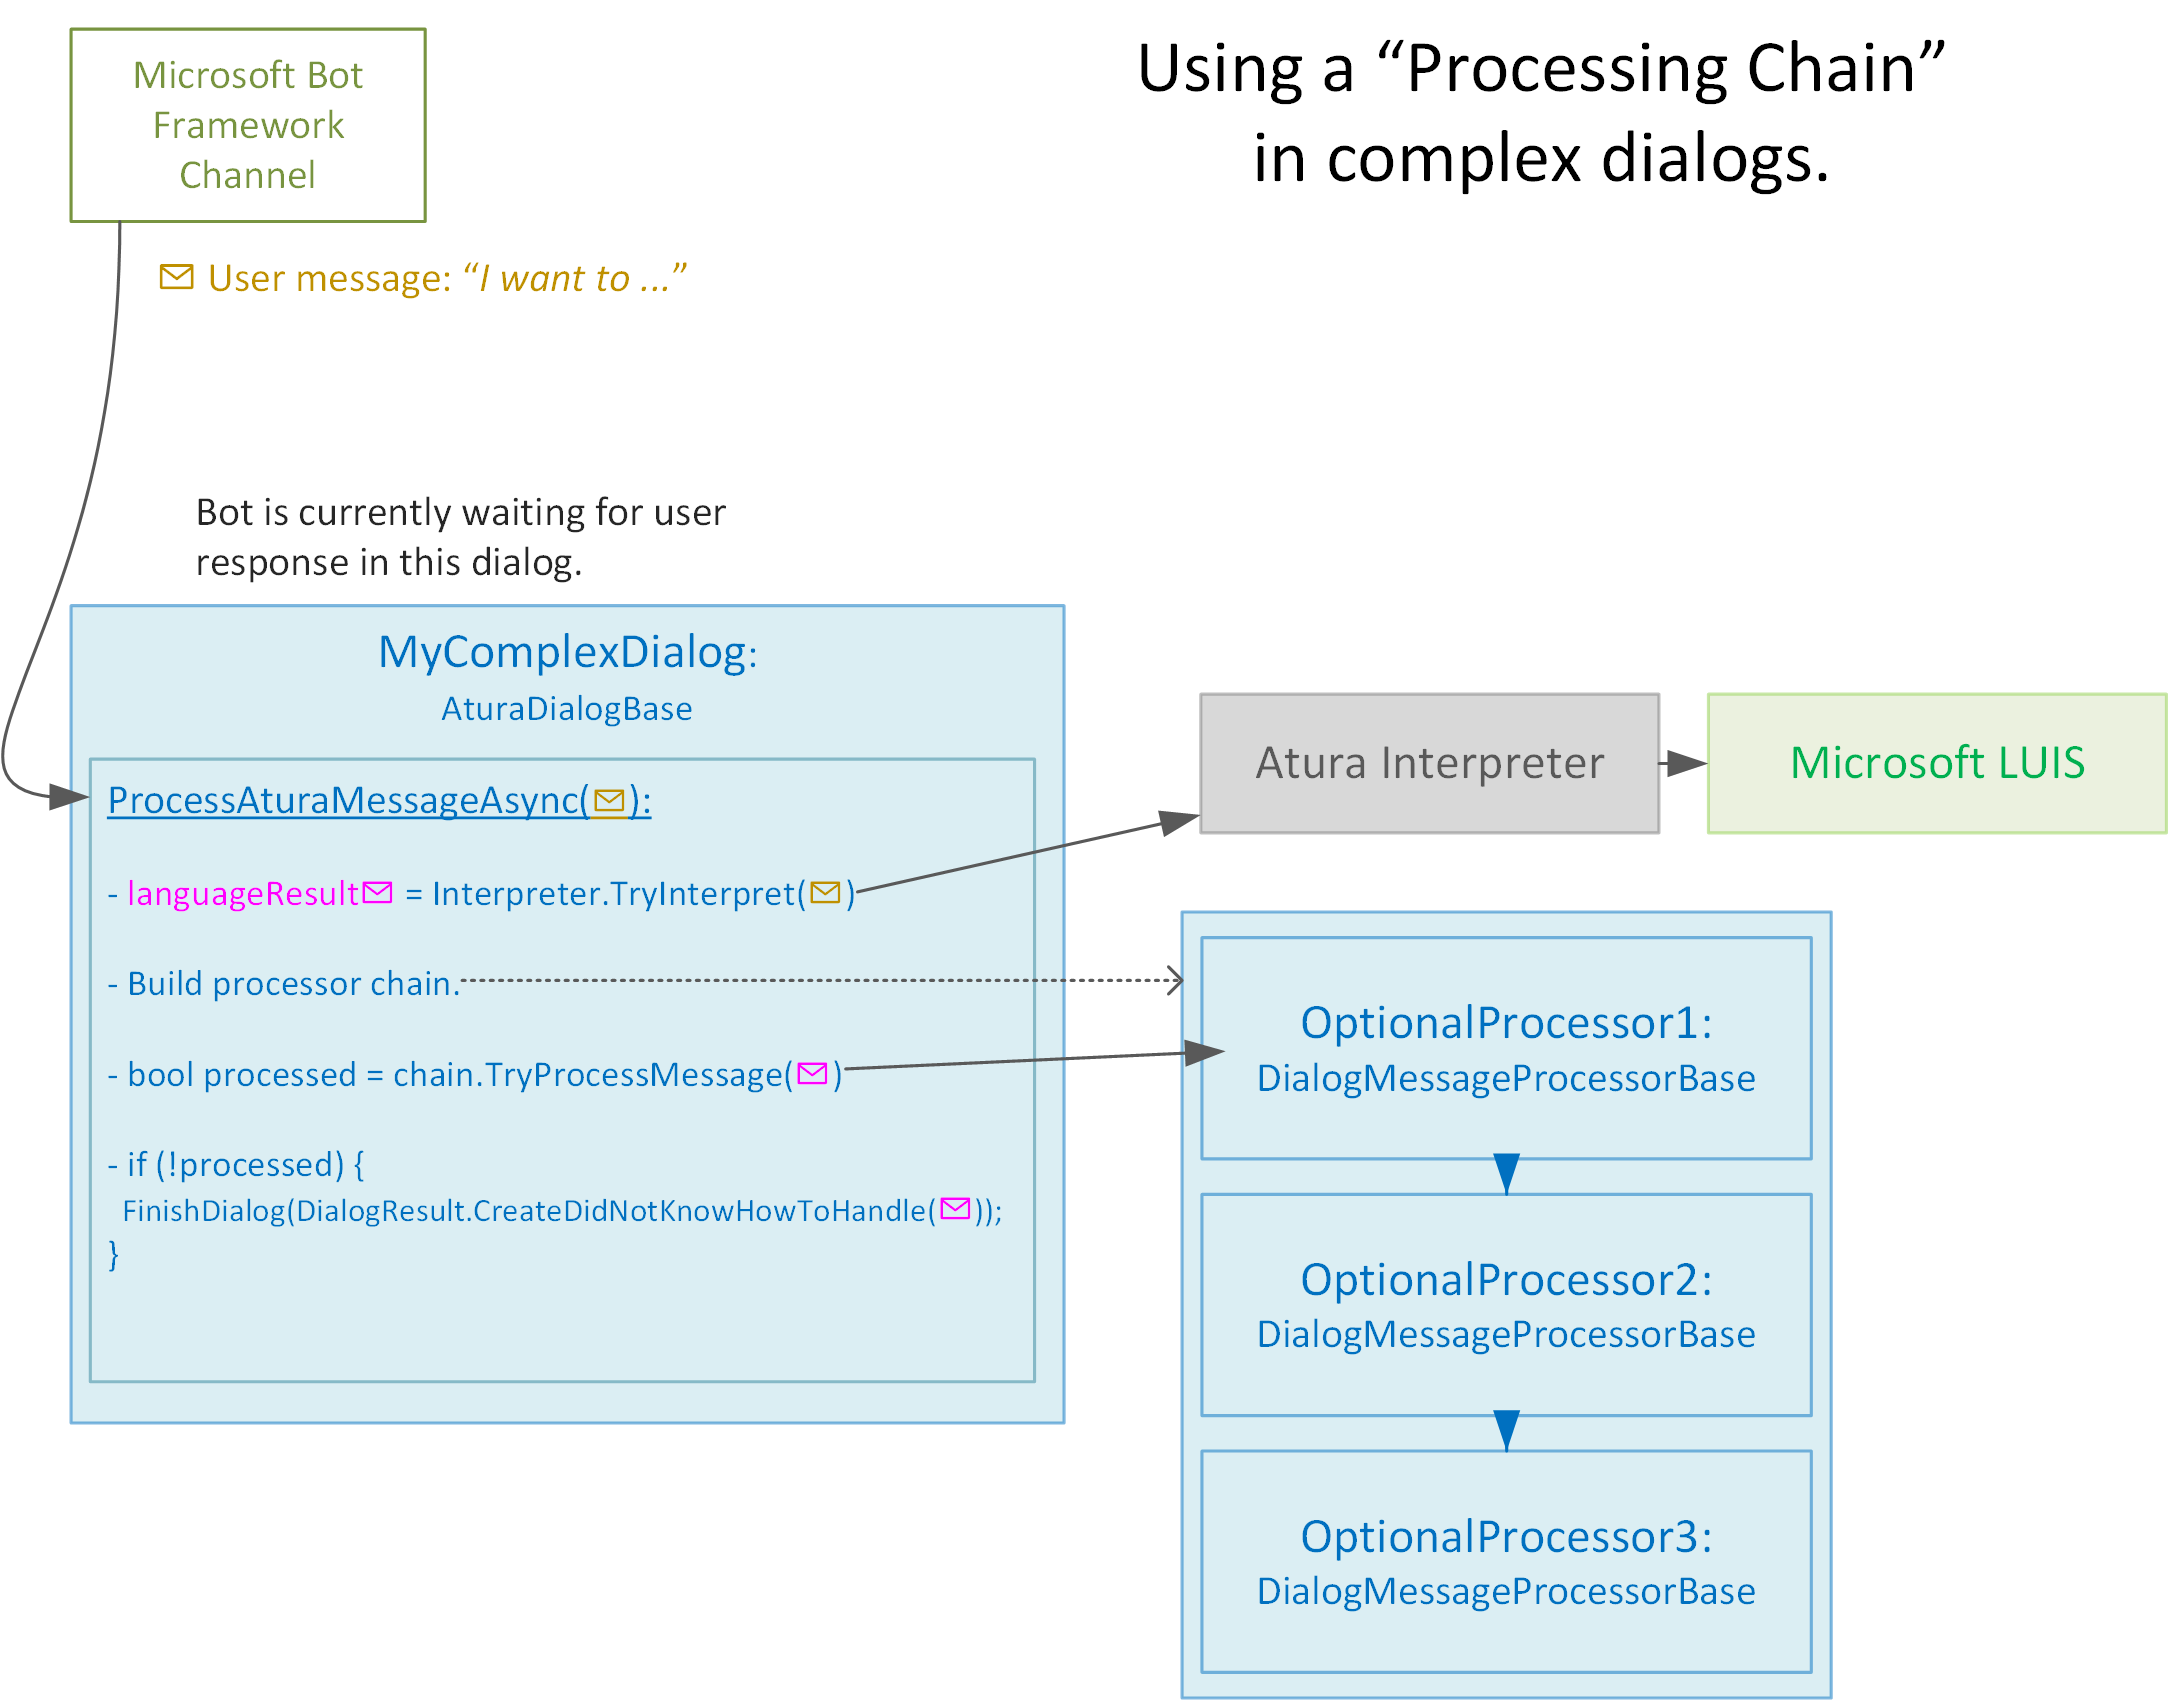
public override async Task ProcessAturaMessageAsync(AturaDialogContext context,
IDialogContext dc,
IMessageActivity message)
{
await base.ProcessAturaMessageAsync(context, dc, message);
var interpreted = await Interpreter.InterpretAndSaveMessageAsync(
context: context,
dc: dc,
userMessage: message,
extLanguageApiAppId: ExtLanguageApiAppId,
extLanguageApiAppSecret: ExtLanguageApiAppSecret);
var chain = new CommonIntentMessageProcessor(sourceDialog: this, commonIntentHandler: this);
chain
.SetNextProcessorInChain(new EmailDialogMessageProcessor( /* any parameters that the processor needs */))
.SetNextProcessorInChain(new RevertChangesProcessor())
.SetNextProcessorInChain(new BalancesPromptMessageProcessor());
bool processed = await chain.TryProcessMessageAsync(context, dc, message, interpreted);
if(!processed)
{
//We did not know what the user meant. Pass text back to parent dialog to try and handle.
context.FinishDialog(dc, AturaDialogResult.CreateDidNotKnowHowToHandle(message));
}
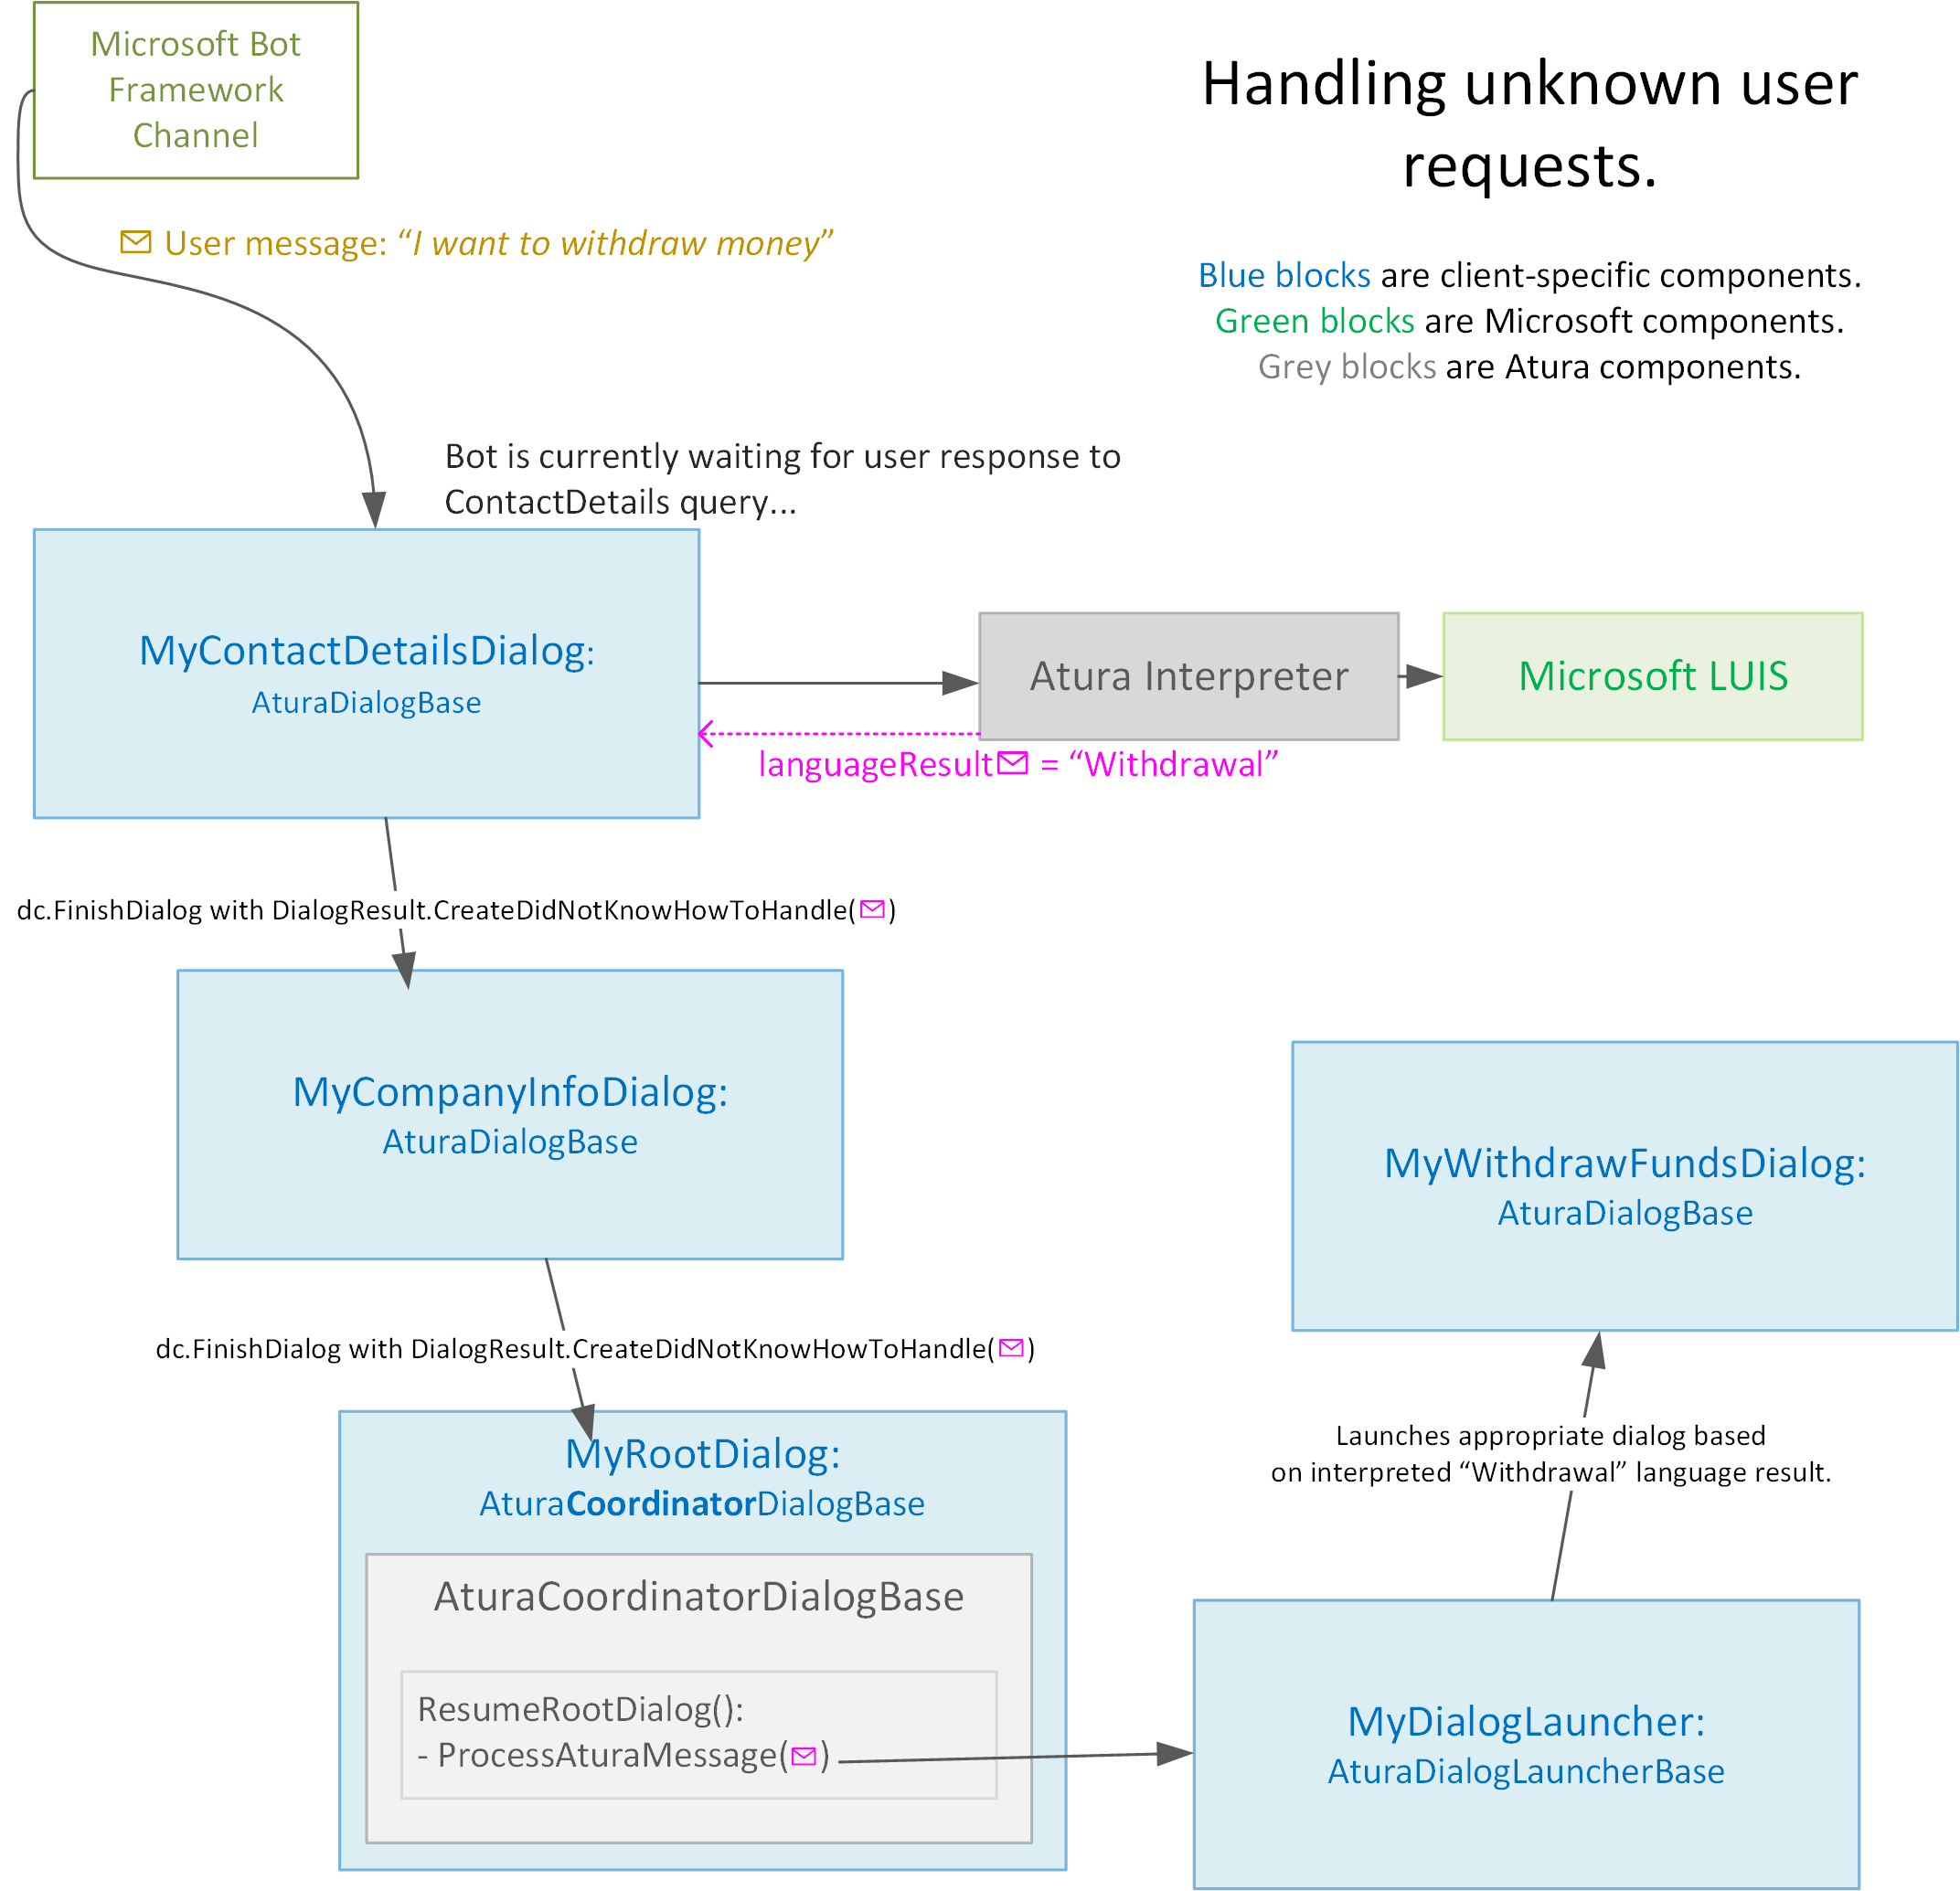
}What to do when a dialog does not know how to handle user's request
As shown in the diagram below, when a user's request arrives at the current dialog's "ProcessAturaMessageAsync" method, the method can decide if it can handle the intent or not. If it cannot, then the current dialog can be "Finished" by passing along the result from:
AturaDialogResult.CreateDidNotKnowHowToHandle(theLanguageResult)
Each "parent" dialog can interpret the unknown message in turn and decide if it can be handled, or if it should be passed up higher in the dialog stack.
Finally, the RootDialog (which inherits from AturaCoordinatorDialogBase) gets a chance to interpret the message. If the message cannot be handled from the Root "Coordinator" dialog, then it is safe to assume that no dialogs can handle the message, and the HandleDontUnderstandResponse method will be called on the RootDialog.
Conversation "context"
When a user's chat message arrives at the Bot web service, Atura deserializes the previous conversation state by leveraging the mechanisms provided by the MS Bot Framework. These include:
UserData
A key/value store with data specific to the user. The assistant can use this store when it needs to store any "global" value that may be needed in future. For example, the type of investor the user is (Financial Planner, Individual Investor etc.) or the encrypted security token (which is used for Client API calls).
ConversationData
A key/value store with data specific to the conversation, not the user. Used in the same way as UserData, but data is visible to all users in the conversation.
Dialog Fields
A "dialog" is a container for conversation state. From a technical perspective, a dialog is simply a C# class that is a subclass of the Bot Framework's "Dialog" class. The dialog class must be serializable and can contain fields and methods just like any other C# class. Fields are serialized and persist while the dialog is active.
BotStrings Resource File:
Adding a resource file will provide a single place to store and reference all your bot utterances. Having one location to update all referenced strings for your test and code base will ensure consistency and make updating the bot phrases much quicker than searching through the entire solution.
To add one, right click on the bot project and select ADD -\> NEW ITEM then under the new menu select VISUAL C# -\> GENERAL -\> RESOURCES FILE

You can replace the placeholders with personal touches for your bot, such as the user's name, or other details related to your application captured earlier in the conversation and stored on the context.
Reference the BotStrings as follows:
context.PostToUserAsync(AturaBotStrings.GreetingPhrase);
context.PostToUserAsync(string.Format(AturaBotStrings.GreetingPhrase, "John"));
Prompt dialogs
Atura provides two types of "Prompt" dialogs: PromptMandatoryUserInputChoicesAsync and PromptUserInputChoicesAsync (non-mandatory). The non-mandatory variant renders a "Cancel" button if the user does not choose any of the specified buttons, so is the preferred option to use, since it gives the user more flexibility. The down-side however is slightly more complexity. The non-mandatory prompt dialog requires a "nullResultCallback" function callback, so that the calling dialog can handle the situation where the user chooses to cancel.
The AturaDialogContext.PromptUserInputChoicesAsync signature looks as follows:
public virtual async Task PromptUserInputChoicesAsync(

    IDialogContext dc,

    ResumeAfterPromptAsync\<string\> resultCallback, //Resume here if the user chose a **valid** option.

    ResumeAfterNullPromptAsync nullResultCallback, //Resume here if user **cancelled**.

    string[] options, //Button text to render.

    string prompt, //Single prompt to show to the user.

    string retryText, //Text to render if user chose an invalid option.

    string[] invisibleOptions = null) //Valid options as plain text input, but don't render buttons.
The Mandatory PromptDialog should be used sparingly. As it leads to a less flexible bot. Users can easily get "stuck" where none of the choices are what they want.
Receiving a user response without using a prompt dialog (resumeAt)
The bulk of a bot's logic typically resides in the following methods: PostStartDialogMessageAsync, ProcessAturaMessageAsync, and in ProcessorChains.
It is possible however to request user input, and then resume in a custom method. For example, note how the first method does not need to use Interpreter.InterpretAndSaveMessage, but the second method does:
//Resumed via a PromptDialog, so NOT necessary

//  to do Interpreter.InterpretAndSaveMessageAsync like second method below.

private async Task WaitForEmailAddressConfirmation(IDialogContext dc, string userChoice)

{

    if(userChoice.EqualsIgnoreCase(ChangeMyEmailAddress))

    {

        //Wait for email address entry, then resume at method GotNewEmailAddress.

        await CurrentContext.PostToUserAsync(dc, MyCustomBotStrings.ChangeOldEmailAddress);

        CurrentContext.WaitThenContinueAt(dc, GotNewEmailAddress);

    }

    else

    {

        await DataRepo.UpdateEmail(CurrentUser, userChoice);

        CurrentContext.FinishDialog(dc, userChoice);

    }

}

private async Task GotNewEmailAddress(AturaDialogContext context, IDialogContext dc, IMessageActivity emailAddressMessage)

{

    //IMPORTANT: Note how Interpreter has to be called, even though nothing is done with the result. This is to ensure that the user response is sent through the system, to the database, and to the Dashboard.

    await Interpreter.InterpretAndSaveMessageAsync(context, dc, emailAddressMessage, ExtLanguageApiAppId, ExtLanguageApiAppSecret);

    if(!emailAddressMessage.Text.IsValidEmailAddress())

    {

        await DataRepo.UpdateEmail(CurrentUser, userChoice);

    }

    /*

       Redacted...

    */

}
Returning dialog responses using AturaDialogResponse.Create()
It is a good practice to chain dialogs together, and keep the focus of each dialog very small and specific (Single Responsibility Principle). For example, a dialog can be created that only asks for a valid user email address. The dialog would do validation, and return a valid email to the "parent" dialog.
For example:
var emailDialog = new GetEmailDialog(prompt: "What is your current email address?");

CurrentContext.LaunchSubDialog(dc, emailDialog, **GotEmailAddressFromUser** );
The email dialog gathers user input, then returns control to the "parent" dialog by calling dc.FinishDialog with an AturaDialogResult. For example, depending on the user input:
- Create(theUsersChosenEmailAddress)
- CreateCancelled - When the user changed their mind and cancelled. Usually a good idea to allow this option.
- CreateDidNotKnowHowToHandle - When we got unexpected user input.
- CreateCrashed(exc) - When we get an exception, but want the parent dialog to handle it.
The "resume" method, GotEmailAddressFromUser, then reads the AturaDialogResult, and handles cancellation (and errors too, if necessary).
private async Task GotEmailFromUser (AturaDialogContext context, IDialogContext dc, AturaDialogResult emailResult)

{

    if (emailResult. **Cancelled** )

    {

        await CurrentContext.PostToUserAsync(dc, MyBotStrings.BackToMainMenu);

        context.FinishDialog(dc);

    }

    else

    {

        await CurrentContext.PostToUserAsync(dc, MyBotStrings.ThanksForTheUpdate);

        await Repo.UpdateEmail(CurrentUser, (string)emailResult.Data);

        /*

         Redacted...

        */

    }

}
Showing/Overriding start message
When a dialog’s StartDialogMessage is configured, a call to base.PostStartDialogMessageAsync() will show the initial message. If the message contains "|" characters, then multiple individual messages will be rendered.
public class MyCustomDialog : AturaDialogBase

{

    public override string StartDialogMessage { get; } = "How may I help today?";

    public override async Task PostStartDialogMessageAsync (AturaDialogContext context, IDialogContext dc)

    {

        await base.PostStartDialogMessageAsync(context, dc);

    }

    /* ... */

}
When StartDialogMessage is not configured (eg. set to null), then a welcome message will not be rendered. This is a common scenario when CurrentContext.ForwardToDialog is used instead of CurrentContext.LaunchDialog when launching the dialog.
You may prompt for user input in this method if desired, for example: an "email dialog" that starts by asking the user for their email address, and then immediately waiting for input. The resumeAt method in this scenario is typically ProcessAturaMessageAsync.
SlowCallPurgatoryDialog
Your bot has to return control to the user within 15 seconds, otherwise the Microsoft Bot Framework will return an error message to the user. This is reasonable, since 15 seconds is a very long time to wait for a response. However, in certain scenarios (eg. when calling slow external web services), 15 seconds is not enough to process a message.
For this scenario, the SlowCallPurgatoryDialog can be used. It is used as follows:
var slowCallDialog = new SlowCallPurgatoryDialog(

    param: anyObjectUsedToPassAlongNecessaryInfo,

    slowCall: (dialogContext, param) =\>;

        {

            return new SlowApiCaller().FetchData((string)param);

        });

context.LaunchSubDialog(dc, slowCallDialog, ResumeWithSlowCallResult);
The ResumeWithSlowCallResult method will be called with the result (or a dialogResult indicating "failure") once the slow call is complete. In the meantime, if the user types any requests, the dialog will ask the user to wait a while longer (hence the name of the dialog "SlowCall Purgatory Dialog").
The dialog can be configured by customizing the "PleaseWait" message, or the number of times or duration to wait before the dialog finishes with a "Timed-out" status.
Atura also provides a more advanced variant of this dialog, the MultiSlowWebServiceCallerDialog, that does multiple slow calls at once on different Threads, useful when the bot needs to make many calls, for example, to load different kinds of information for a user.
PollingPurgatoryDialog
The PollingDialog is similar to the SlowCallDialog mentioned above. It also allows logic to execute for more than 15 seconds, but instead of a single slow call, the PollingDialog keeps executing the specified code block until a predicate returns true (useful for example to keep "asking" a service if user login as completed via an out-of-band login request).
The PollingDialog is used as follows:
var pollingDialog = new PollingPurgatoryDialog(

    pleaseWaitMessage: MyBotStrings.Login\_OutOfBand\_PleaseApprove,

    paramToPassPollCall: anyParamToPassToPollCall,

    pollingCall: async (param) =\> await CallLoginStatusServiceAsync(param),

    externalCallCompletePredicate: (result) =\> IsCallComplete(result),

    secondsToPollBeforeTimingOut: 20);

await context.LaunchSubDialogAsync(dc,

    childDialog: pollingDialog,

    resumeAt: GotPollingResult);
CORS and allowed origins
In order to host your bot in the Webchat widget on a client website, the client's website host must be added as an "allowed host", so that browser CORS validation succeeds.
Custom domains are added to the bot's client.config file, similar to the following:
<allowedDomains>
  <add host="myClientSite.com" originUrl="https://myClientSite.com"/>
</allowedDomains>
Dependency Injection and how to use AturaDependencyInjectionConfigBase
Atura uses AutoFac to configure dependency injection. To configure your own additional dependency injection, add your component registration as follows to Global.asax, and your own DependencyInjectionConfig class:
public class GlobalAsax : System.Web.HttpApplication

{

    protected async void Application\_Start()

    {

        var containerBuilder = new ContainerBuilder();

        new DependencyInjectionConfig().Configure(containerBuilder);

        /* Redacted... */

    }

}

public class DependencyInjectionConfig : AturaDependencyInjectionConfigBase

{

    public void Configure(ContainerBuilder diContainer)

    {

        //Ensure Core DI is configured

        base.ConfigureBase(diContainer);

        new MyOwnCustomDependencyInjectionConfig().Configure(diContainer, new SettingsHandler());

    }

}

public class MyOwnCustomDependencyInjectionConfig : IClientSpecificConfigureDependencyInjection

{

    public void Configure (ContainerBuilder diContainer, ISettingsHandler featureToggles)

    {

        diContainer.RegisterType\<MyCustomClass\>().As\<IMyCustomClassProvider\>();

        /* Etc... */

    }

}
Unit Testing
Since bots hide most features behind a single text input, it is often difficult to test the entirety of a bot end-to-end. Thus unit tests are especially important to ensure that all flows continue to behave as expected, even if they haven't been tested in a while.
Atura has unit testing helper classes that make writing TDD-style tests very simple. For example, the following test was written before the actual implementation, and served as a good "roadmap" to build the flow from start to finish:
//MSTest is used here, but any unit testing framework can be used.
[TestClass]

public class TestAskForHelp: AturaDialogTestBase

{

  [TestMethod]

  public async Task Help\_Asked\_After\_Hours()

  {

    //arrange

    MockCurrentTimeAfterHours();

    //act

    await TestFlowAsync(

      UserSays(Hi there, Intents.Common.UserGreeting),

      ExpectBotResponses(MyBotResxFile.Root.Greeting, MyBotResxFile.Root.MenuPrompt),

      UserSays(help, Intents.Common.Help),

      ExpectBotResponses(MyBotResxFile.Root\_Help\_Prompt),

      UserSays(Consultant, Intents.Common.Help),

      ExpectBotResponses(

        MyBotResxFile.Root\_Help\_WouldYouLikeAnAgentToContactYouBack),

        UserSays(No),

        ExpectBotResponses(MyBotResxFile.Root\_Help\_ContactUsHint)

        );

        //Ensure live agent takeover does not happen after-hours.

        A.CallTo(() =\> AturaContext.ConversationHandler.SetUserNeedsAssistanceStateForUserData(A\<string\>.\_\_, FakeDialogContext, true))

        .MustNotHaveHappened();

      }

    }
Note how even the expected responses from the NLP engine (the "intents") are mocked out to ensure the tests are fast and don't actually call the NLP engine.
To gain access to the testing functionality offered by the Atura framework, you will need to add the following NuGet package to your Testing project, similar to the core bot package installed earlier.

How to customize the web-chat widget and embed on your website?
CLIENT SPECIFIC CUSTOMIZABLE STYLES
Most of the bot configurable settings that are offered from the Atura SDK can be customized in the client.config file.
All images must be saved in the solution path: "./Content/images/{botname}/icon.png"
| Header | Header | Header |
|---|---|---|
| Bot Name | <botNamename="aturaBot"/> | This is the botname that will be referenced in scripts and pathing for content. |
| Friendly Bot Name | <friendlyBotNamename="Genius Bot" /\> | This is the name of the bot, as shown to the user in some prompts. |
| Chat Icon | <chatIcon> <svgxmlns= xxxx> </chatIcon> | This is the icon that will be displayed before a user clicks on your bot. |
| Bot Icon | <botIconvalue="android-icon.png"/> | This will be the icon displayed in the title bar header for your bot on the web chat |
| Pop-Up Title | <popupTitlevalue="Hi I'm Atura Bot"/> | This is the title above your pop-up text before the user opens the bot. |
| Pop-Up Text | <popupTextvalue="How can I help you today?"/> | This text will be displayed on the web chat to grab the users eye to your bot. |
| Pop-Up Behaviour | <popupBehaviourvalue="singleRender"/> | This is the default pop-up bubble time to display for your Chatbot on page load. Can also be set to alwaysRender |
| Title Bar Icon | <titleBarIconvalue="logo-icon.png"/> | This is the image that is displayed in the title bar when the custom webchat is opened. |
| Typing Indicator | <indicatorTypingvalue="typing-indicator.svg"/> | This points to the loading image your users will see while the bot is replying |
| Welcome Messages | <welcomeMessages><msg>Hi I'm your Virtual Assistant.</msg> </welcomeMessages> | The opening message your users will see upon opening the web-chat version of your bot. |
| Webchat title bar | <botNamename="Atura Bot Assistant"/> | This is the title of your bot once the web chat is open |
| Welcome Message Menu | <welcomeMessageMenuvalue="What can I do for you today? Joke;Help;Contact Us"/> | The first few menu options your user will be presented with. |
Common pitfalls
Calling base.ProcessAturaMessageAsync in the wrong place, or forgetting to call it.
When overriding ProcessAturaMessageAsync or PostStartMessageAsync, be sure to call the "base" method. The base "Process" and "PostStartMessage" methods load logged in user context, assigns CurrentContext, and other important actions.
Not calling the interpreter in the ProcessAturaMessageAsync method, or a dialog resume method.
It's important to include the following code block in ProcessAturaMessageAsync method overrides. This call ensures that the user message is sent to the database and to the Dashboard.
public override async Task ProcessAturaMessageAsync (AturaDialogContext context, IDialogContext dc, IMessageActivity message)

{

    await base.ProcessAturaMessageAsync(context, dc, message)l

    var interpreted = await Interpreter.InterpretAndSaveMessageAsync(

        context,

        dc,

        message,

        ExtLanguageApiAppId,

        ExtLanguageApiAppSecret);

    // Logic based on 'interpreted'...

}
See section nr 4 for code example.
Getting stuck in Mandatory Prompt Dialog.
It is easy to use the prompt dialog and specify mandatory options, but this leads to a poor user experience, since the user has no way to continue without selecting one of the specified options.
See section nr 3 for proper usage of mandatory and non-mandatory prompt dialogs.